Not having a lot of time to do everything on the (want) to do list can be rather stressful when you want to relax and craft! But when I get to craft, it can be uplifting! What's also uplifting are the comments some of you leave. Thank you very much! Anyway, this blog post is in English today because I also did not have the time to write it in Dutch, nor translate. But since we are on the topic, could you please tell me what language you prefer to read Hobby Alternatief in? (P.S. Als je wil echt in Nederlands lezen, probeer het "Vertaal" functie links!]
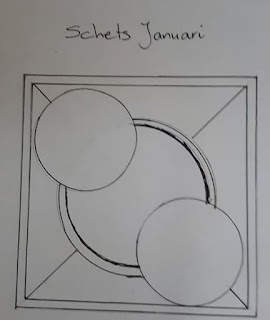
Since I don't have a lot of time to make this January card sketch, I kept it simple and easy. This card only took about 30-45 minutes to make.
 |
| The sketch for January. |
I started with a folded square card base. I then chose two patterned paper from the same set (so they match better), cut a square size from each patterned paper, then cut it diagonally from one corner to the other. With the triangle pieces, I then cut it in half from the right angle corner to the center of the hypotenuse. (Go high school mathematics knowledge!)
Once everything is cut, I took 4 triangles, flipped them over and pieced them into a square. I taped the squares together with double-sided tape and added more tape onto the edges. I then stuck the newly created background onto my card base.
Next it was time to make the center circle. To make the vellum under-piece, I first traced a circle with a die, lined up the stamp, stamped with StazOn Pigment Piano Black ink, and then cut the circle out by hand. As a side note, StazOn Pigment stamps very beautifully on vellum! The result is much more beautiful than regular StazOn. Anyway, I then used runner tape to stick the vellum onto the center of the card.
The center white circle I made by tracing the circular starry die, running the die through my Cuttlebug, and cutting the white circle out by hand. Using a soft make-up brush, I brushed the center of the white circle with Distress Oxide Picked Raspberry. I then stuck this onto the center with 1mm foam tape. Finally, I added foam stickers (the flowers and hearts) onto the card and it's done!
 |
| Close-up, mainly to showcase the ink on the vellum! |
Thanks for reading! I hope you perhaps learned something or got inspired. Try to make time for crafting whenever you can! Until next time!
===LIJST VAN PRODUCTEN / PRODUCT LIST===
In de webwinkel vind je een assortiment van de meest gebruikte producten. Vind je niet wat je zoekt, neem gerust contact met ons op en wij proberen dit zo voordelig mogelijk voor je te bestellen.
* Papier / Paper *
Euroland hobby karton - linnenstructuur 13.5x27cm
Studio Light - Patronen karton [DS9126-05]
Perkament / vellum
Euroland hobby karton - linnenstructuur 13.5x27cm
Studio Light - Patronen karton [DS9126-05]
Perkament / vellum
* Stempels / Stamps *
Ali Express - Happy Birthday rondje
Ali Express - Happy Birthday rondje
* Snijmallen / Dies*
Ali Express - Rondje sterren
* Overig / Rest *
Foam stickers - heart and flower shapes
Make-up brush
Double-sided tape
Cricut Cuttlebug
Foam stickers - heart and flower shapes
Make-up brush
Double-sided tape
Cricut Cuttlebug


Hello Emma
BeantwoordenVerwijderenWhat a beautifull card, i like the colors! This inspired me! Have a nice day!
Greetings, Martha
As always, thank you for your kind comments Martha!
VerwijderenHi Emma
BeantwoordenVerwijderenI love your fun colourful spring version.
I have the old versions of the Stazon inks, and as it happens my black is completely dried out so I think I will replace it with this newer version. :)
XoXo Carina
PS. for me there is no difference between reading in English or in Dutch. ;)